
Supplies
- FloraCraft® CraftFōM®:
- 2" x 12” x 36” Sheet – White
- Glitter Paint:
- Blue
- Purple
- Pink
- White
- (6) 9” x 12” Sheets Felt – Black
- Decorative Wire – Silver
- Pony Beads – Black
- Acrylic Jewels:
- Crystal
- Purple
- Pink
- Chenille Stem
Tools
- Low-Temp Glue Gun
- Yard Measuring Stick
- Black Marker
- Small Hand Saw
- Wire Cutters
- Paint Brushes
- Drop Cloth
Instructions
- Use the yardstick to measure and draw out sixty-six 2” x 2” cubes on the foam sheet.
- Use the hand saw to cut the 2” cubes from the foam sheet carefully. To help ensure a straight cut, hold the yardstick on the line and use the edge as a guide while you cut. Be sure to always keep the blade at a 90-degree angle to the top of the foam sheet to keep a straight edge. Use pieces of scrap foam as sanding blocks to sand and shape the pieces as needed.
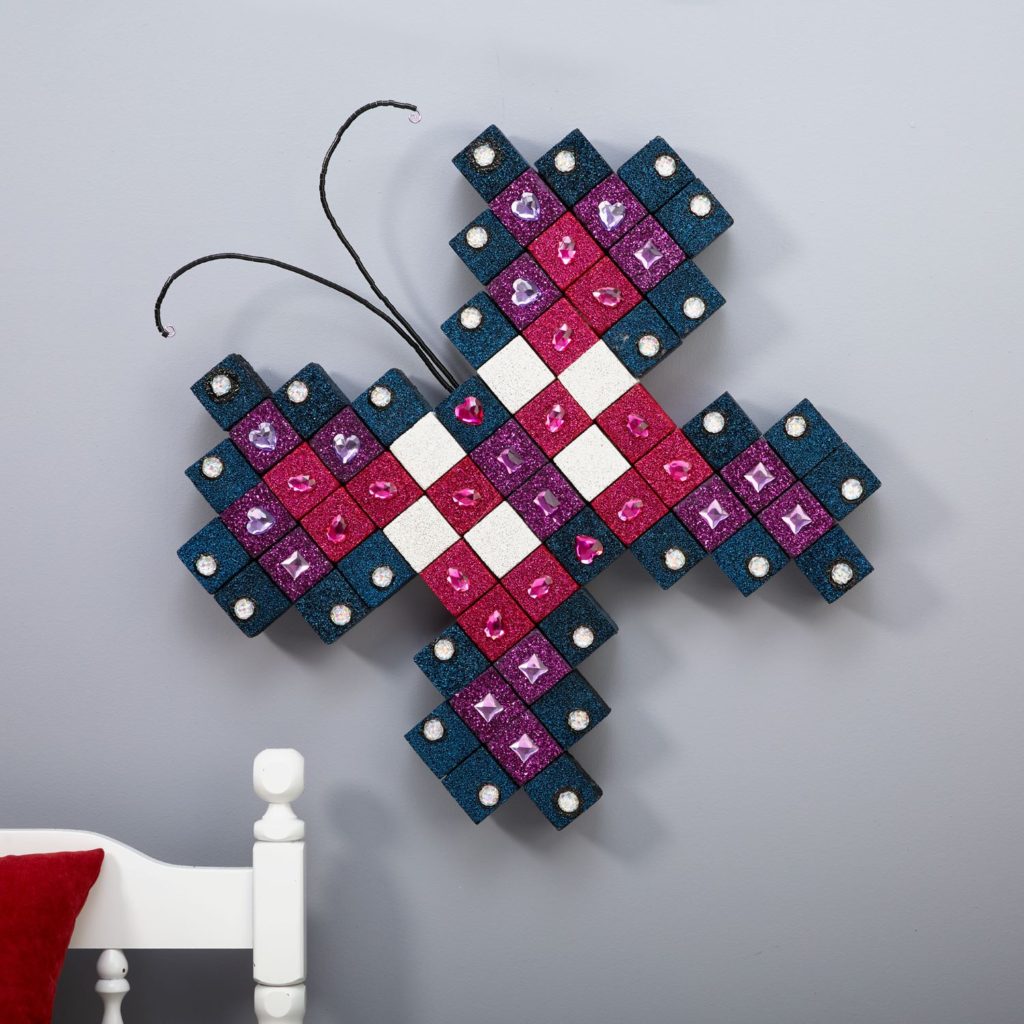
- Lay out your pattern as shown in the image above. Copy the colors in the image or create your own. Separate the cubes by color. Lay down the drop cloth and paint the cubes the desired colors. Let dry.
- Cut 101 pieces of felt 1 7/8” x 1 7/8”. As you assemble the butterfly, glue a piece of felt between the cubes where they touch. This will give a little separation and outline the individual “pixels.”
- Cut two 18” pieces of wire. Bend a small loop in one end of the wires to keep the beads from sliding off. Thread the beads onto the wires, leaving about 2” of wire at the end to insert them into the butterfly. Add glue to the ends of the wires and glue them in place.
- Glue the jewel accents to the butterfly.
- Twist the chenille stem into a loop. Generously glue the twisted ends into the back of the butterfly for the hanger.
-
 Birthday Gift Tumbler MugSkill level: Beginner
 -
 Birthday Era GarlandSkill level: Beginner
 -
 Kitchen Word ArtSkill level: Beginner
 -
 Front Porch ReindeerSkill level: Beginner
 -
 Disco Party DécorSkill level: Beginner
 -
 Jute Covered Disc Wall DécorSkill level: Beginner
 -
 Fabric Ruffled Chicken DecorSkill level: Beginner
 -
 Garden Bug FriendsSkill level: Beginner
 -
 Long Legged SpiderSkill level: Beginner
 -
 Glitter Anchor DécorSkill level: Beginner
 -
 Gold Glitter StarSkill level: Beginner
 -
 Haunted Mantle DecorSkill level: Beginner
 Subscribe


