
Supplies
- FloraCraft® CraftFōM®
- 8" Ball - White
- 2 1/2" x 10" Burlap Ribbon - Green
- Spray Color - Brown
- Textured Finish - Orange
- 1 1/2" x 5 1/2" Branch (Outdoors)
- (3) Large Rubber Bands
- Permanent Marker - Black
Tools
- Serrated Knife
- Floral Shears
- Old Metal Fork
- Old Newspapers
- Large Cardboard Box (For Spraying)
- Glue Gun and Glue Sticks
Instructions
- To evenly divide the ball into six equal sections, place one rubber band vertically around the ball. Vertically place second and third rubber bands onto the ball so that all rubber bands cross each other at the top and bottom center. Adjust rubber bands to make six equal sections. Use a marker to trace along one edge of each rubber band. Remove rubber bands.
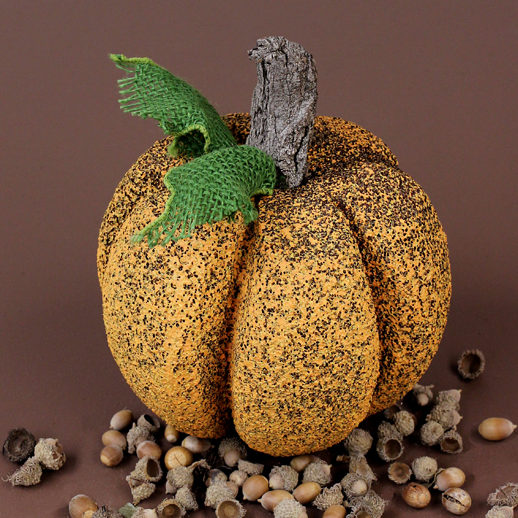
- Use Floral Foam Knife to cut a 4″ diameter slice off both the top and bottom of the ball (where marker lines meet). To make pumpkin creases, use a knife to cut along one vertical marker line about 1″ deep. Then shave off the foam on each side of the line. Continue shaving until edges along that line are rounded, like a pumpkin crease. Repeat with all six lines. On top, shave off foam to make the pumpkin round and indent at the center.
- Press stick into the top center, going in about 2″. Continue shaving the ball to shape into a pumpkin as needed. When satisfied, carefully remove and set aside the stick for now. Insert a fork into the stem opening to hold the pumpkin while spraying.
- In a well-ventilated, newspaper-covered area (inside a cardboard box), spray the entire pumpkin with October Brown. Then lightly spray with a pumpkin-color textured finish, allowing brown to show through still. (Note: If the pumpkin is too brown, spray a more textured finish. If it becomes too light, simply re-spray brown again and then apply a lighter application of textured finish.) Let dry. Remove fork.
- Use Floral Shears to cut 6″ and 4″ lengths of Green Wired Burlap Ribbon. Pinch each at one end, and hot glue both ends just down into the opening where the stem goes. Apply glue to the bottom of the stick and reinsert for the stem. Gently pull and scrunch burlap ribbon to shape. Fray slightly as desired.
-
 Birthday Gift Tumbler MugSkill level: Beginner
 -
 Birthday Era GarlandSkill level: Beginner
 -
 Kitchen Word ArtSkill level: Beginner
 -
 Front Porch ReindeerSkill level: Beginner
 -
 Disco Party DécorSkill level: Beginner
 -
 Jute Covered Disc Wall DécorSkill level: Beginner
 -
 Fabric Ruffled Chicken DecorSkill level: Beginner
 -
 Garden Bug FriendsSkill level: Beginner
 -
 Long Legged SpiderSkill level: Beginner
 -
 Glitter Anchor DécorSkill level: Beginner
 -
 Gold Glitter StarSkill level: Beginner
 -
 Haunted Mantle DecorSkill level: Beginner
 Subscribe


