
Supplies
- FloraCraft® CraftFōM®:
- Sheets: (2) 1”x 12”x 36”
- Discs: (2) 10”x 1”
- 16 oz. Snow Texture Spray
- Acrylic Paint:
- Red
- White
- Glitter - Red
- (2) Large Glittered Leaves - Red
- (6) Glittered Leaves - Bright Green
- (2) Glittered Poinsettias - Red
- Natural Branches - Painted White
- Holiday Print Ribbon:
- 5/8”
- 1.5”
- 2.5”
- (6) Holiday Ornaments
Tools
- FloraCraft® Foam Tools
- Low-Temp Glue Gun
- Wire Cutters
- Small Spatula or Wide Flat Brush
- Scissors
- Pencil
- Pins
- Paper
Instructions
- Use the spatula or brush to cover the front and sides of both foam sheets with snow texture spray. Apply a thin solid coat for even coverage. Set aside to dry.
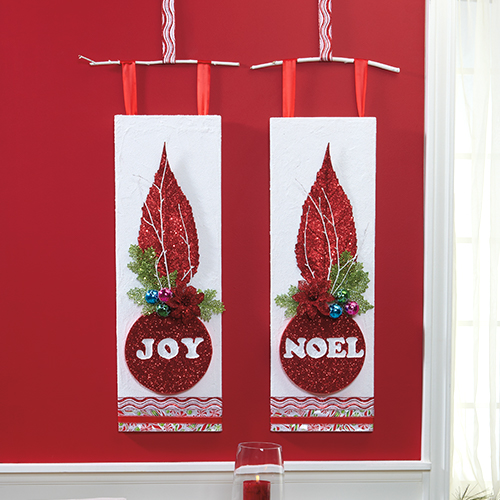
- Search online for a font you like to spell “JOY” & “NOEL.” Print and cut them out to use as templates. Pin the letters centered onto the discs evenly spaced. Use a pencil to trace around the letters. Use the tucking tool from the Foam Tools and follow the pencil line to create an impression around the letters about 1/8” deep. Now use the scribe tool with firm pressure to compress the foam. Stay inside the lines you created with the tucking tool. Paint the letters white with acrylic paint and let dry.
- Paint the fronts of the discs red while the paint is still wet sprinkle with red glitter. The paint will act as the glue and secure the glitter as it dries. Once dry, glue 1” ribbon around the edges of each disc to finish, then glue the discs to the front of the foam sheets. Center the discs about 5” up from one end as shown.
- Cut lengths of the different widths of ribbons and glue them to the bottom of each sheet. Overlap the ribbons to create interest.
- Glue a large, glittered, red leaf centered above each disc. Use the top of the disc to arrange the stems and branches. Insert a few white branches into the disc in front of the red leaves. Push the green leaves on each side at the base of the white branches. Push a red poinsettia tight at the top of the disc, then glue three ornaments next to the poinsettias.
- Cut two thicker white branches about 16” long for the hangers. Attach the branch to the top of the sheet using 12” lengths of ribbon. Glue and pin the ends of two pieces of ribbon spaced about 7” apart to the top back of the sheet. Glue the opposite ends of the ribbons around the branches evenly spaced.
-
 Birthday Gift Tumbler MugSkill level: Beginner
 -
 Birthday Era GarlandSkill level: Beginner
 -
 Kitchen Word ArtSkill level: Beginner
 -
 Front Porch ReindeerSkill level: Beginner
 -
 Disco Party DécorSkill level: Beginner
 -
 Jute Covered Disc Wall DécorSkill level: Beginner
 -
 Fabric Ruffled Chicken DecorSkill level: Beginner
 -
 Garden Bug FriendsSkill level: Beginner
 -
 Long Legged SpiderSkill level: Beginner
 -
 Glitter Anchor DécorSkill level: Beginner
 -
 Gold Glitter StarSkill level: Beginner
 -
 Haunted Mantle DecorSkill level: Beginner
 Subscribe


