
Supplies
- FloraCraft® CraftFōM®:
- 4" Ball - White
- Fabric:
- Orange
- Yellow
- Dark Orange
- Black Thread
- String or Yarn
- Small Branch
Tools
- 8" Scissors
- Glue Gun and Glue Sticks
- Sewing Machine
- Rotary Cutter
- Foam Tucking Tool
- Ruler
- Cutting Mat
- Pencil or Marker
- Sewing Pins
Instructions
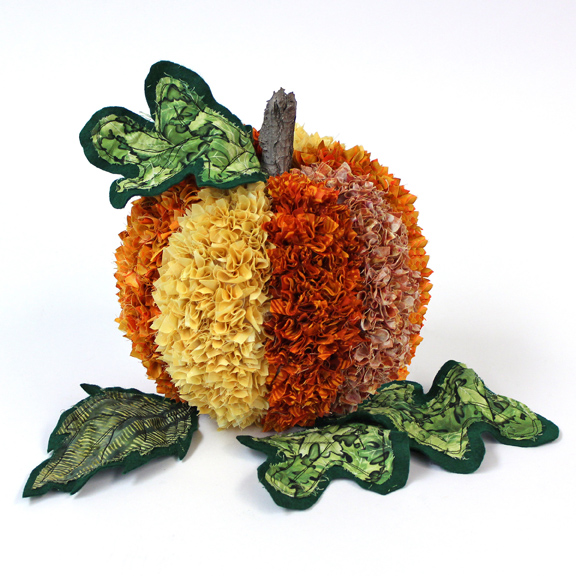
- To divide the pumpkin into sections, horizontally wrap the string around the middle of the foam ball. Mark with a pencil (or marker) to divide the ball in half. Looking at the ball from the top, move the string so it is perpendicular to the middle line, and mark with a pencil, to divide the ball into quarters. Then move the string and mark two more times to divide the ball into eighths. Remove string and discard. (Ignoring the horizontal center line, there should be a total of 8 vertically marked sections.)
- With a foam cutter, cut ½” deep along one section line. Then about 1/2″ on both sides of the cut line, make angled cuts to carve an indentation (valley) all along the line. Continue to carve indentations on all vertical, marked lines. (Ignore the first horizontal, middle line.) To exaggerate sections, make valleys 1” deep and sections more rounded. (Note: The reason is that adding fabric will fill up indentations.)
- For pumpkin base, use foam cutter to cut 1/4″ slice off bottom. (Note: Cut piece will be about 3″ diameter circle.) For stem opening, use a knife to cut a 2″ diameter x 2″ deep hole on top of the pumpkin. In the cut area, re-sculpt sections as needed.
- With a rotary cutter, acrylic ruler, and cutting mat, cut ten 1 1/2″ wide strips from one orange fabric. Cut fabric strips into 1 1/2″ squares. Set aside. Repeat to cut other fabrics into 1 1/2″ squares. Set aside in separate piles.
- Working on one pumpkin section at a time, attach a fabric square, using a tucking tool in the Foam Toolset, to push the center of the fabric square into foam. Continue pushing in squares, approximately 1/4″ apart, in staggered rows until one section is covered. (Note: Do not cover the flat bottom of the pumpkin.) With the same fabric, cover the section on the opposite side of the one just covered. Similarly, use another color of squares and cover the next pumpkin section and the opposite section. Repeat until the pumpkin is covered with the other two fabrics.
- Use leaf patterns to cut from felt, three large and one small leaf (along outer lines). Similarly, cut leaves from green fabrics along patterns’ dotted lines. Layer fabric leaves on corresponding felt leaves. Use a sewing machine to “doodle” stitch with black thread around the fabric leaf about 1/8″ from the cut edge. Also sew vein lines. (Tip: To “doodle” stitch, stitch around the leaf somewhat carefully the first time, then stitch around leaf second time going faster so that stitching is intentionally irregular for a sketched look.) Allow fabric to fray and show character.
- Arrange leaves under the pumpkin as desired. For the stem use a glue gun to insert a small length of the branch into the top of the pumpkin. Attach one leaf on top, spot gluing as desired to hold shape.
-
 Birthday Gift Tumbler MugSkill level: Beginner
 -
 Birthday Era GarlandSkill level: Beginner
 -
 Kitchen Word ArtSkill level: Beginner
 -
 Front Porch ReindeerSkill level: Beginner
 -
 Disco Party DécorSkill level: Beginner
 -
 Jute Covered Disc Wall DécorSkill level: Beginner
 -
 Fabric Ruffled Chicken DecorSkill level: Beginner
 -
 Garden Bug FriendsSkill level: Beginner
 -
 Long Legged SpiderSkill level: Beginner
 -
 Glitter Anchor DécorSkill level: Beginner
 -
 Gold Glitter StarSkill level: Beginner
 -
 Haunted Mantle DecorSkill level: Beginner
 Subscribe


