Supplies
- FloraCraft® CraftFōM®:
- FloraCraft® Diorama Kit
- Frog Life Cycle Acrylic Model Set
- Habitat Landscaping:
- Moss
- Grasses
- Pebbles
- Scrapbook or Construction Papers:
- Bright Green
- Blue
- Yellow
- Blue Plastic School Folder or Scrapbook Paper
- Markers or Paint Pens:
- Green
- Red
- Toothpicks
Tools
- Tacky Glue
- Scissors
Instructions
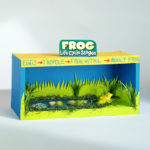
- Assemble the Diorama kit following the instructions on the package.
- Measure the inside wall dimensions and cut pieces of blue paper to the correct size and glue to the inside walls of the diorama. Measure the two outside wall dimensions and the two ½” front wall dimensions, cut blue paper to fit and glue in place to cover front and inside walls. It’s up to you whether to finish the back with blue paper or just leave bare.
- Measure the inside floor dimensions and the 1” strip on the bottom front of the diorama. Cut pieces of the green paper to fit and glue in place to cover floor and front edge. Now cut 3” wide strips of green paper long enough to cover the little ½” front walls and the inside walls of the diorama. Cut a jagged edge along one side of the 3” strips to look like grasses and glue the strip to the bottom edge of the inside walls and the two front ½” walls. This gives a nice backdrop for your landscaping.
- Measure the top dimension of the diorama. Cut yellow paper to fit and glue in place to cover the top. Cut a 1” strip of yellow paper long enough to cover the front top edge of the diorama for your life cycle labeling. Use the green and red markers or paint pens to write: Eggs > Tadpole > Frog W/Tail > Adult Frog. Glue in place as shown.
- Cut the cardboard label from the packaging and use it as the sign for your diorama as shown or cut a piece of paper and create your own sign for the top. Glue a toothpick to the back of the sign, cut the toothpick end to about ½” and glue into the top of the diorama.
- Cut an oval shape out of the blue plastic folder or the scrapbook paper with a water print and glue in place on the floor of the diorama. Glue little bits of moss around the ponds edge. Glue groups of grasses, moss and pebbles around to create the frog’s habitat.
- Glue the eggs, tadpole and frog with tail in the water in a line to show the stages of the frog in the water. Glue the adult frog half out of the pond to show it can be in the water or on land.




 Subscribe


