Supplies
- FloraCraft® CraftFōM®:
- 1”x12”x36 Sheets - White
- 5” Cube - White
- Acrylic Paint:
- Black
- Green
- Orange
- Purple
- Fabric Paint:
- White
- Orange
- Purple
- Spanish Moss
- Craft Sticks
- Spider Webbing
- Large Container or Basket
Tools
- Foam Cutter or Serrated Knife
- Low-Temp Glue Gun
- Paint Brush
Instructions
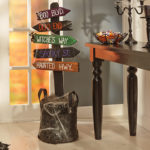
- Use the foam cutter or serrated knife to cut the foam sheet into four 3”x 36” long boards. Set aside one piece for the sign post. From the other three foam boards cut the following lengths; one 20”, one 18”, one 17”, one 16” and one 13” long piece. The cuts do not need to be exactly straight, a little off will add to the rustic look. Cut a point in one end of each board as shown. Cut grooves into the opposite end of the boards for a weathered, broken board appearance. Use the knife to randomly shave away the crisp edges of the foam boards so they appear smooth and worn.
- Paint all boards black and let dry. Paint the 20”, 17” and 13” orange, green and purple, letting a little of the black show through. Let dry.
- Arrange the foam boards smallest to largest as shown. Point the ends in the desired directions. Write the road names onto the sign boards (as shown or make up your own) with the fabric paint and let dry.
- Glue the sign together using low-temp glue, attaching the sign boards to the sign post at slightly irregular angles.
- Secure the cube into the container. Glue craft sticks into the bottom of the sign post and insert the post into the top of the cube. Secure with low-temp glue.
- Cover the top of the container with Spanish moss to conceal the foam. Stretch spider webs over the sign and container to embellish.









 Subscribe


