Supplies
- FloraCraft® CraftFōM®:
- (24) 15/16" x 3 7/8" Discs - White
- 2 5/8" x 4" Soup Can (Optional)
- 1"–1.5" Crown Rubber Stamp(Optional)
- Spray Color:
- Red
- Black
- 40" Square Matte Board - Black
- (8) 12" x 12" Cardstock - Red
- 8" x 12" x 5" Box (To Store Checkers)
Tools
- Tape Runner or Double-Sided Tape
- Duct Tape or Shipping Tape
- Old Newspapers
- Large Cardboard Box (For Spraying)
- Paper Trimmer
- Craft Knife
- Cutting Mat
- Ruler
- Yardstick
- Pencil
Instructions
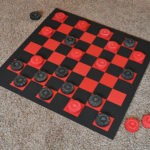
- In a well-ventilated, newspaper-covered area (inside the large box), spray both sides and edges of twelve discs with two coats of red. Let dry. Similarly, spray twelve more discs with two coats of black and let dry.
- OPTIONAL: Checkers can be left solid red and black, or you can impress a design into their surfaces as follows:Place Foam Disc on the table. Firmly press the crown to rubberstamp in the center, going down about 1/8″. (Note: You can substitute a lapel pin or child’s crown toy for a rubber stamp – anything that will make something similar to a crown shape.) To impress the circle, the center open end of soup can focus on the disc and press down enough to impress foam about 1/8″ deep. Last, create lines in the border by impressing the end of a ruler going from the circle out. Space lines 1/4″ apart, going all around the disc. Repeat with all discs. (Note: You will see white foam in the recessed areas. This helps show the detail of the impressions.)
- For playing board, measure and mark 40″ square on matte board. If it’s necessary to piece together two sheets to get a 40″ square, measure, and mark boards accordingly. Then use a craft knife and yardstick on the cutting mat to trim as needed. If piecing, turn boards over with tops down and butte edges together. Use duct tape or shipping tape to join. Turn the playing board right side up. Measure 2″ from all edges and draw a light borderline. Then measure and lightly mark placement lines that divide the inside space into 4 1/2″ squares. (Note: There will be eight rows of squares going vertically and horizontally.)
- Use a paper trimmer to cut four 4 1/2″ squares from each sheet of red paper. Use a tape runner close to the edges of red squares and press one into every other penciled square on the board to create a checkerboard design.
- Storage note: To protect checkers, align them into one black and one red row and store them in a small box. Ask players to handle gently. To repair any chips, re-spray. To store checkerboard, slide between cabinet or dresser and wall.



 Subscribe


