
Supplies
- FloraCraft® CraftFōM®:
- Balls:
- (6) 1” - White
- (3) 1.5” - White
- (3) 2” - White
- (3) 2.5” - White
- (3) 3” - White
- (2) 4” - White
- Cones:
- 6" - White
- 9" - White
- Balls:
- Acrylic Paint:
- Mint Green
- White
- Silver
- Triple Thick Gloss Glaze
- Textured Metallic Yarn - Silver
- Toothpicks
Tools
- Foam Cutter or Serrated Knife
- Paint Spatula or Putty Knife
- FloraCraft® Smooth Finish™
- Flat Paint Brush
- Fine Sanding Block
- Straight Pins
Instructions
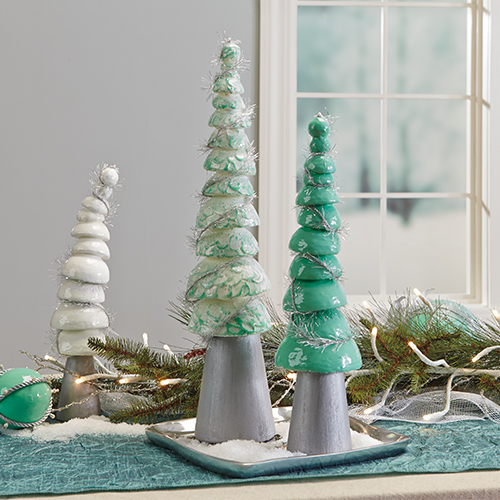
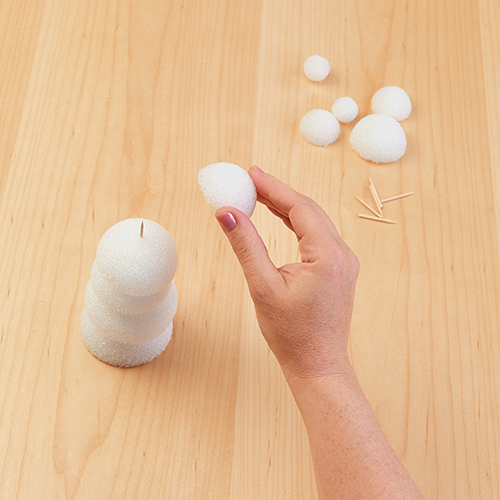
- For the tallest tree; cut a 4”, 3”, 2.5”, 2”, and 1.5” ball in half. Glue the half balls together, stacked one on top of the other, from the largest to the smallest, with ½ toothpicks inserted in between each layer. Glue two 1” balls on top of the tree. Stack the balls straight up or asymmetrically as shown. The medium tree uses a 4”, 3”, 2.5”, 2” and a 1.5” ball. Set aside one-half of the 4” ball for a future project. Stack and glue the half balls together the same as you did for the large tree and glue two 1” balls to the top. The smallest tree uses a 3”, 2.5”, 2” and a 1.5” ball. Stack and glue the half balls together and glue two 1” balls to the top.
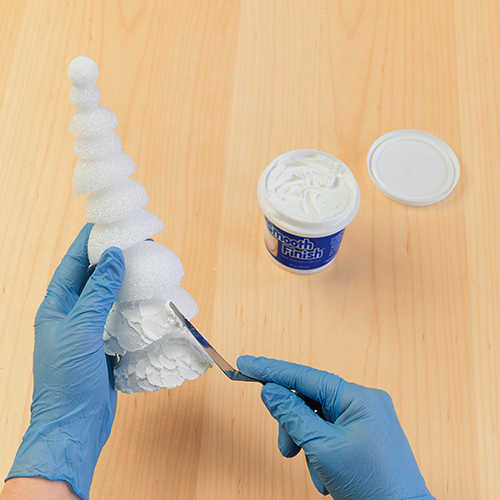
- Thoroughly coat the trees with Smooth Finish™. Smooth Finish™ can be applied to foam in a couple of different ways; with a spatula or a flat paintbrush. Be sure to mix the material before using it. When using a spatula, apply a small amount of the Smooth Finish™ to the foam and spread it out evenly in all directions, working it into the cells of the foam. If using a paintbrush, load material onto the brush and spread it onto the foam, smoothing out the lumps as you go.
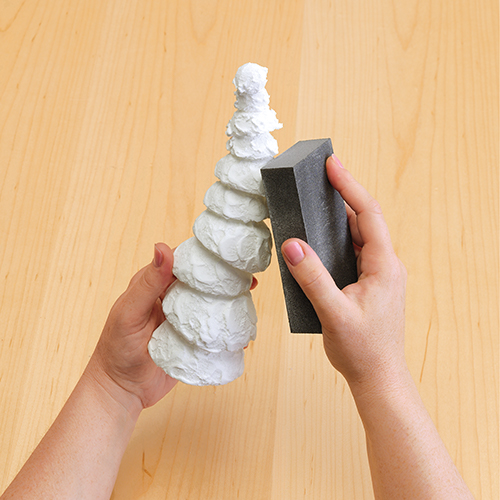
- To create the textured finish on the largest tree, use the brush first to apply the coating to the crevices of the tree, and then use the spatula to create small overlapping ripples in the coating. Apply a small mound of Smooth Finish™ to the tree and then another small mound overlapping that. Keep working with the coating until the tree is coated and fairly uniform. Let dry completely. Use the sanding block to slightly sand the raised areas of the tree to give the smooth appearance shown.
- To create a super sleek finish on the smaller trees, use the brush to smooth the coating as you apply it. You can apply it first with the spatula and then smooth it out with the brush or use the brush to apply to the entire tree. Let dry. Use the sanding block to create an all-over smooth appearance.
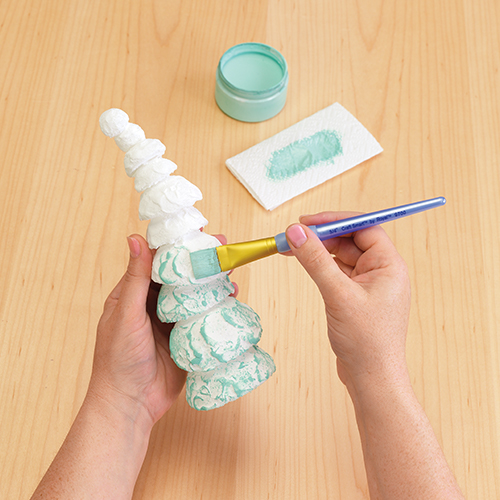
- Use a dry brushing technique to apply mint paint to the textured tree. Apply a light amount of paint to the flat brush, then wipe excess paint on a paper towel. Using the side of the brush, lightly brush across the raised areas of the tree, leaving the lower textured areas bare. Paint the medium tree mint green and the small tree white. Let dry completely.
- Apply an even coat of gloss glaze to all three trees and let dry.
- To create the tree trunks, cut the top 4-inches off the 9 –inch cone using the serrated knife. Use the bottom 5-inches of the cone for the base of the largest tree. Cut about ¾-inch off the top of the remaining 4-inch of the cone; this is the base for the smallest tree. Cut the top 2.5-inches off the 6-inch cone. Use the bottom of the cone for the medium-sized tree base. Coat the three tree bases with Smooth Finish™, let dry, then sand the bases smooth. Paint the bases silver and let dry.
- Insert toothpicks halfway into the tops of the bases and glue the trees in place.
- Embellish the trees with the metallic yarn. Pin the end of the yarn to the top of the tree and spiral it down to the bottom. Secure the yarn with a pin at the bottom of the tree.
-
 Birthday Gift Tumbler MugSkill level: Beginner
 -
 Birthday Era GarlandSkill level: Beginner
 -
 Kitchen Word ArtSkill level: Beginner
 -
 Front Porch ReindeerSkill level: Beginner
 -
 Disco Party DécorSkill level: Beginner
 -
 Jute Covered Disc Wall DécorSkill level: Beginner
 -
 Fabric Ruffled Chicken DecorSkill level: Beginner
 -
 Garden Bug FriendsSkill level: Beginner
 -
 Long Legged SpiderSkill level: Beginner
 -
 Glitter Anchor DécorSkill level: Beginner
 -
 Gold Glitter StarSkill level: Beginner
 -
 Haunted Mantle DecorSkill level: Beginner
 Subscribe


