
Supplies
- FloraCraft® CraftFōM®:
- Extruded Wreaths:
- (2) 8” - White
- (2) 14” - White
- Balls:
- (8) 1” - White
- 4” - White
- 5” - White
- 6” - White
- (2) 8” - White
- Extruded Wreaths:
- 10" Decorative Mesh - White
- Acrylic Paint - Black
- 1.5” Sheer Ribbon - Black
- Chenille Stems - Black
- Feather Boa - Black
- (8) Assorted Sizes Craft Eyes - Black
- Craft Batting
- Cheesecloth
- Craft Sticks
Tools
- Foam Cutter or Serrated Knife
- Low-Temp Glue Gun
- Scissors
- Floral Pins
Instructions
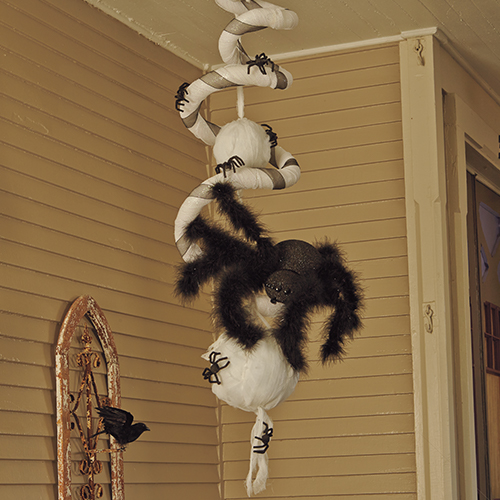
- To create the spiral den, cut each wreath in half using the foam cutter or serrated knife. Attach the ends of the half wreaths in a spiral pattern. Insert a craft stick into the end of each wreath before gluing them together for a secure hold. Use the four 8” half wreaths for the top of the spiral and then attach the four 14” half wreaths spiraling to the bottom.
- Gather the end of the mesh and pin it to the end of the 8” wreath at the top of the spiral. Tightly wrap the mesh around the wreaths to completely cover the spiral. Cut the mesh and pin the end again at the bottom. Pin the sheer black ribbon at the top of the den and spiral it around the wreaths, pinning again at the bottom.
- To create the hanging cocoons, cover an 8”, 6”, and 4” ball with craft batting, gluing to secure in place. Cut strips of cheesecloth and loosely wrap each ball, leaving some of the batting exposed. Cut strips of cheesecloth and glue and pin them to the tops of the balls for hangers. Hang the largest ball from the bottom of the spiral with pins. Hang the 6” ball in the center of the spiral and the 4” ball from the top of the spiral.
- To create the large spider, cut the 8” and the 5” balls in half. Use the other half of each ball to create a second spider or reserve it for a future project. Shape the head and body of the spider into ovals by pressing the foam on a hard surface. Continue shaping until your spider has a look you desire. Glue the head to the body. Insert a craft stick into the back of the head before attaching it to the body for a secure hold. Paint the balls black and set them aside to dry.
- Twist two chenille stems together for each of the eight legs. Cut 14” lengths of feather boa for each leg. Cut 24 pieces of 1.5” stem to use as ties. Secure one end of the boa to the leg about 1” up from one end. About halfway down the leg, secure the boa again; this is where the leg bends. The boa will be slightly longer than the end of the stem. Loop the boa and secure the loop to the end of the stem. This creates a fuzzy foot. Repeat this step for each leg. Secure the stem from each leg into the body just behind the neck (4 on each side).
- Cut two 3” pieces of chenille stem. Fold each piece in half and twist the ends together. Shape a slight bend and glue it into the front of the face for the pinchers. Glue four eyes on each side of the head just above the pinchers, as shown.
- To create the small spiders, paint a 1” ball black and let dry. Cut a chenille stem in half and fold each half in half again. Glue the folded ends of each half stem into the 1” ball, two on each side to create eight legs.
-
 Birthday Gift Tumbler MugSkill level: Beginner
 -
 Birthday Era GarlandSkill level: Beginner
 -
 Kitchen Word ArtSkill level: Beginner
 -
 Front Porch ReindeerSkill level: Beginner
 -
 Disco Party DécorSkill level: Beginner
 -
 Jute Covered Disc Wall DécorSkill level: Beginner
 -
 Fabric Ruffled Chicken DecorSkill level: Beginner
 -
 Garden Bug FriendsSkill level: Beginner
 -
 Long Legged SpiderSkill level: Beginner
 -
 Glitter Anchor DécorSkill level: Beginner
 -
 Gold Glitter StarSkill level: Beginner
 -
 Haunted Mantle DecorSkill level: Beginner
 Subscribe


