
Supplies
- FloraCraft® CraftFōM®:
- Sheets:
- ½”x12”x36” - White
- 1”x12”x36” - White
- Cube: 5” Cube - White
- Sheets:
- Spray Paints:
- Primer
- Copper
- Clear Sealer
- Acrylic Paints:
- Metallic Gold
- Bright Gold
- 5/8”x18” Wood Dowel
- Metallic Gift Wrap - Gold
- Metallic Ribbon or Scrapbook Paper - Copper
- Wire Ornament Hooks - Gold
- Acrylic Crystal Drops - Assorted Sizes
Tools
- Foam Cutter or Serrated Knife
- Low-Temp Glue Gun
- Wire Cutters
- Flat Paint Brushes
- Drop Cloth
- Card stock
- Straight Pins
Instructions
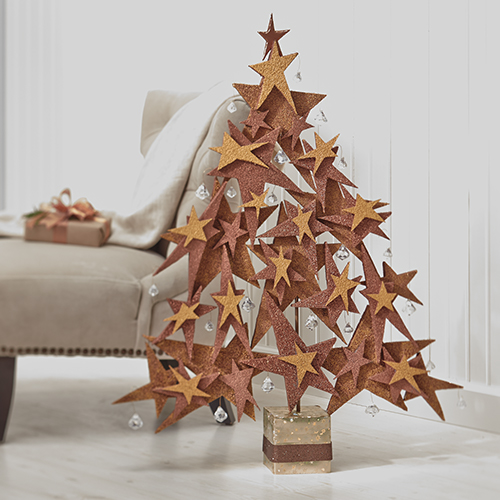
- Draw star patterns onto the cardstock and cut them out to create your templates. You should have at least five sizes of stars ranging from 12” to 2” across at the widest points. Draw the different-sized stars by hand, so they are all unique in shape. You can also find a large selection of star templates online.
- Pin the largest star template onto the 1” thick foam sheet. Cut out the star using the edge of the template as a guide as you cut. Hold the blade at a 90-degree angle to the template to ensure an even straight edge. Be sure to follow the package instructions carefully. Repeat this step to cut out 6 of the largest stars.
- Arrange the six large stars on the table. Lay them out in a long triangular shape with points touching. Place one star in the center and the other stars around it to form a triangular shape. This is the base shape of the tree. Glue the stars together. Carefully insert the dowel into the bottom of the center star about 2”. Glue the dowel to secure it in place. Glue the base stars together where the points to touch.
- Repeat step #2 to cut out about eight each of the next two largest sizes of stars. Glue the stars evenly spaced on top of the base stars. Be sure to position the stars to help connect and secure the base stars and fill in the tree shape.
- Repeat step #2 to cut out about ten each of the two smallest sizes of stars from the ½” thick foam sheet. Glue the stars wherever needed to fill in the tree shape as shown.
- Lay the tree on the drop cloth and base coat the entire tree (front, sides, and back) with light coats of primer to cover completely. Be sure to hold the can at least 12” away and do not apply too heavy of a coat at one time. This will prevent the spray from melting the foam. Let dry.
- Apply light coats of copper spray paint to the entire tree to completely cover. Let dry. Spray the entire tree with the clear sealer and let dry.
- Use a paintbrush to add the metallic gold acrylic paint to the fronts of the six largest base stars on the tree. Apply a light dry brushing allowing some of the copper to show through.
- Use a paintbrush to add the bright gold to the smallest two sizes of stars on the front of the tree. Paint the stars evenly spaced, leaving some of the smaller stars copper as shown.
- Wrap the cube completely with a gift wrap. Embellish with copper ribbon or a strip of scrapbook paper.
- Slice a small hole in the top of the cube and insert the dowel. Remove dowel, add some glue, then reinsert dowel.
- Use the ornament hooks to embellish the tree with the crystal drops. Insert the hooks directly into the foam to hang the drops from the points of the stars.
-
 Birthday Gift Tumbler MugSkill level: Beginner
 -
 Birthday Era GarlandSkill level: Beginner
 -
 Kitchen Word ArtSkill level: Beginner
 -
 Front Porch ReindeerSkill level: Beginner
 -
 Disco Party DécorSkill level: Beginner
 -
 Jute Covered Disc Wall DécorSkill level: Beginner
 -
 Fabric Ruffled Chicken DecorSkill level: Beginner
 -
 Garden Bug FriendsSkill level: Beginner
 -
 Long Legged SpiderSkill level: Beginner
 -
 Glitter Anchor DécorSkill level: Beginner
 -
 Gold Glitter StarSkill level: Beginner
 -
 Haunted Mantle DecorSkill level: Beginner
 Subscribe


